ROLE OF COLOR FILTERS AND LIGHT SOURCES IN FORENSIC PHOTOGRAPHY
ROLE OF COLOR FILTERS AND LIGHT
SOURCES IN FORENSIC PHOTOGRAPHY
Introduction-
Forensic Photography is finished by numerous experts
with the related lawful perspectives to generate the accuracy in the evidences
present at the crime scene. It empowers
the forensic photographer to catch the nature and the distinct appearance of
the proof so that for reconstruction of the crime scene could be effectively
done. There are many reason to realize that because of the absence of the
fitting light sources and filters the nature of the result is corrupted.
What are colour filters?
A filter is a reasonable material that drench up
certain colors and enables others to go through. A shading channel is a sheet
of an easy substance that alters a light beam by specific assimilation of
certain colours in connection to other people. An unbiased filter splash up all
wavelength equally and just serves to lessen the power of the light emission
without changing its colour. The colour filters are used to upgrade the nature
of the specific article when caught. It only enable the specific frequency of
light to pass on and transmit just such measure of light.

https://blog.upskillist.com/filter-guide-have-digital-cameras-made-coloured-filters-obsolete/
Filters can be of three classes:
1. Correction filters: for the redress of the
wavelength of the light entering a focal point.
2. Protection filters: to ensure the front focal
point.
3. Effect filters: to give an enhancement to a
picture.
The accompanying show the differences:
https://www.photographingspace.com/colour-vs-mono-camera/
The latent fingerprint were not noticeable
unmistakably without the filter, subsequently when connected the channel and
utilize the cutting edge innovation to cause the prints progressively centered
which to can undoubtedly be identified by the crime scene investigator. So it
is uneasy and somewhat hard to perceive the prints and concentrate its example
in the brilliant photo as a proof.
Technical Photography- The sort or strategy for photography utilized in crime scene
photography and proof is called technical photography. Crime scene photographer
must take brilliant technical picture to guarantee the photo can be utilized in
the examination procedure and at last in the court.
Technical photo are photos that show much detail
or data about the view or article imagined as could be expected. The best
technical photos have four qualities. They are accurately uncovered, have most
extreme depth of field, are free from contortion, and are in sharp core
interest. While much of the time there are conditions that make this
troublesome or unimaginable (e.g., close-up photographs will always have shallow
depth of field), crime scene and forensic photographer must endeavor to take
photos with these attributes.
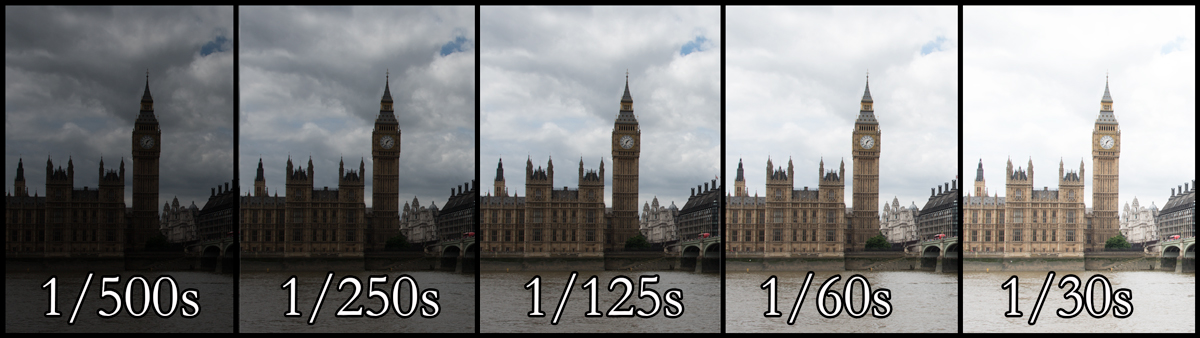
Correct Exposure- Scientific photos must be effectively uncovered.
Right exposures are vital for the film to catch detail in all pieces of a
scene, including feature territories and shadows. Underexposed photos lose
detail in the shadows while overexposed photos lose detail in the feature
territories. The correct exposure enables the expert to take care of the
precisely and to catch the proof with likely more flawlessness.
Presentation is controlled with the assistance of
intensity speed and focal point opening. Most cameras can be worked in manual
and programmed modes. Programmed frameworks and programmed streak units produce
satisfactory outcomes in most ordinary circumstances. Be that as it may, in
certain circumstances the programmed introduction frameworks may create wrong
exposures. Some typical issue lighting circumstances to be aware of incorporate
profoundly intelligent scenes, brilliant sun lit scenes with profound shadows,
and backdrop illumination.
http://digitalphotographylive.com/exposure/
Bracketing- Bracketing includes making a progression of exposures of a similar subject at various exposures, typically at one stop or one-half stop interims. A few cameras can be set to naturally section at chosen bracket at selected exposure differences from the metered exposure.
https://www.highdynamicranger.com/wp-content/uploads/2016/01/exposure-bracketing.jpg
High Dynamic Range Photography- With bracketing you may have at least two photos to take a gander at to see all the detail in the features and shadows in the view. An approach to decrease the two photos to one photo is to utilize High Dynamic Range (HDR) photography. High-dynamic-range photos are by and large accomplished by catching numerous bracketed photos, and after that blending them into a solitary HDR picture.
https://9to5mac.com/wp-content/uploads/sites/6/2013/06/2img_0021.jpg?resize=768,514
Flash Fill- One increasingly important system for
guaranteeing precise exposures, particularly for scenes with profound shadows,
is glimmer fill. In scenes enlightened by brilliant daylight there will
typically be dull shadow zones. Now and then proof is situated in the shadows.
Detail in the profound shadow region might be lost when the introduction is set
up on the general brilliance of the situation. By the utilization of blaze
fill, the splendour level in the shadow regions can be raised to the general
brilliance of the situation.
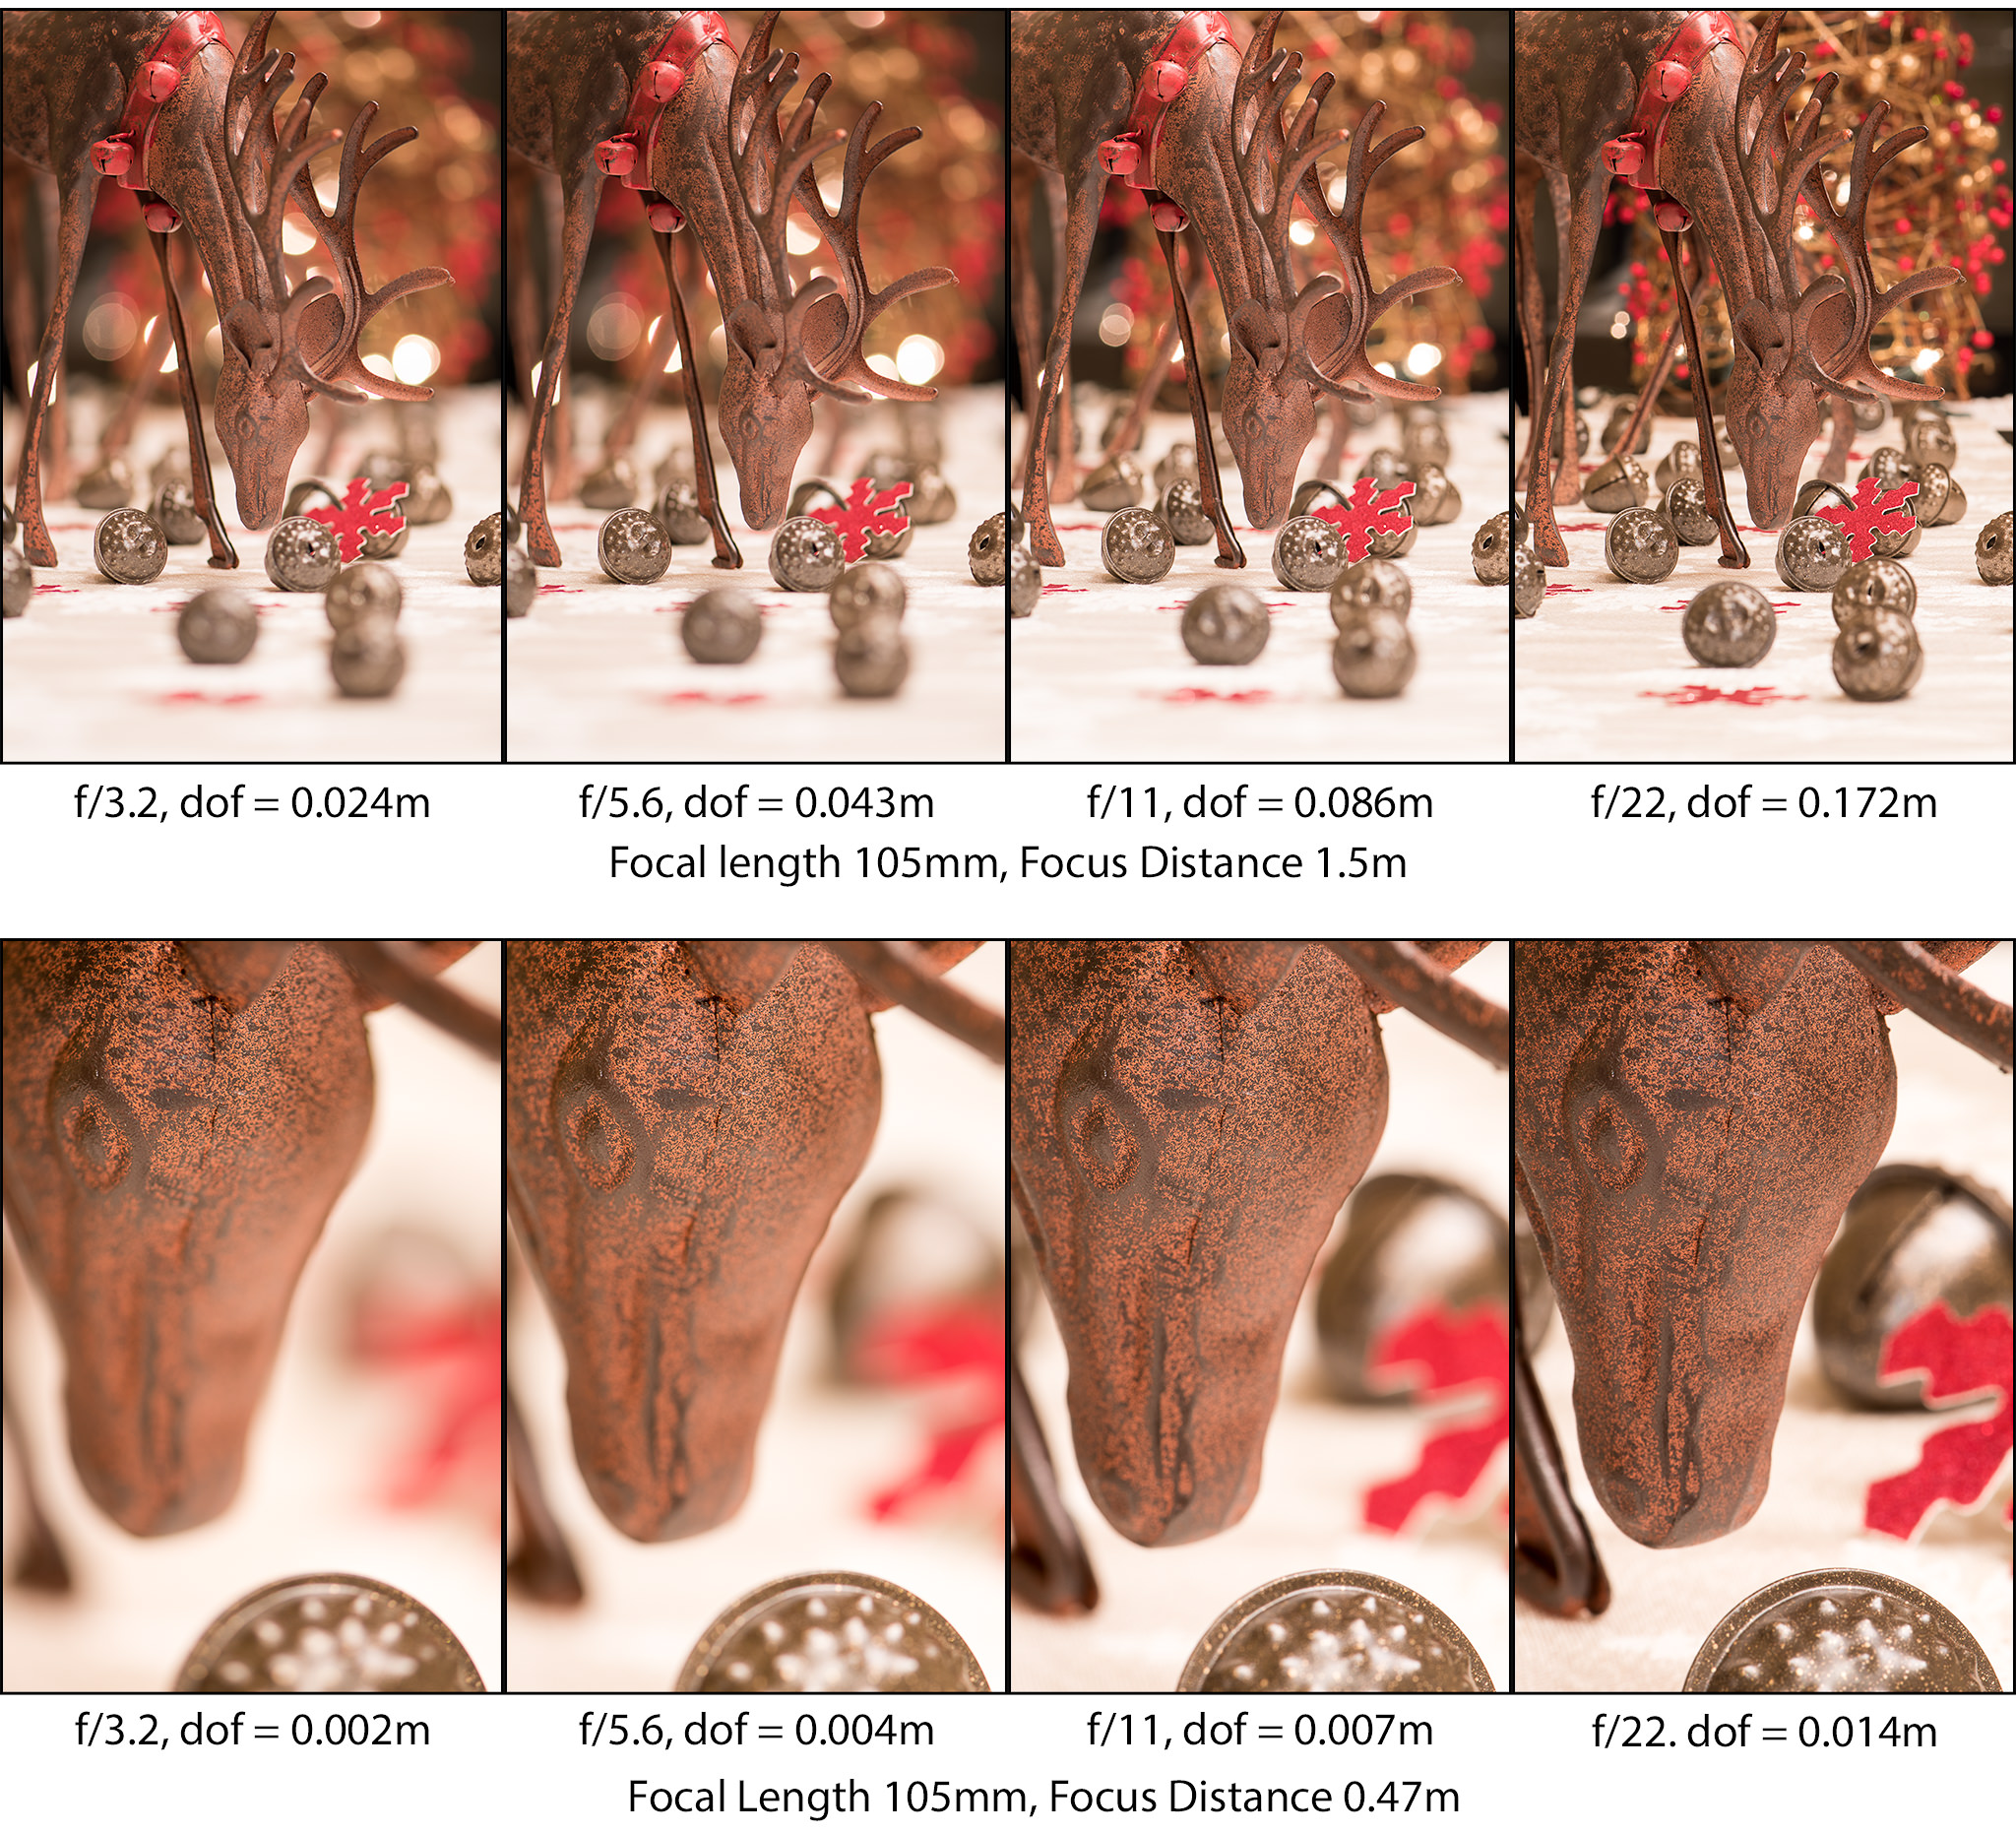
Maximum Depth of Field- Specialized photos must have greatest depth of field. Depth of field, frequently called the plane of sharpness, is the territory in a photo where items are in sharp core interest. Wrongdoing scene photos and proof photos ought to have however much in centre as could reasonably be expected. This is on the grounds that out of centre regions of a photo can progress toward becoming issues in court. A contradicting lawyer could propose that you deliberately made a region be out of centre in a photo to cloud some extra proof that could have been plainly unmistakable if appropriately shot.
https://photographylife.com/wp-content/uploads/2016/12/Focus-Distance-Comparison.jpg
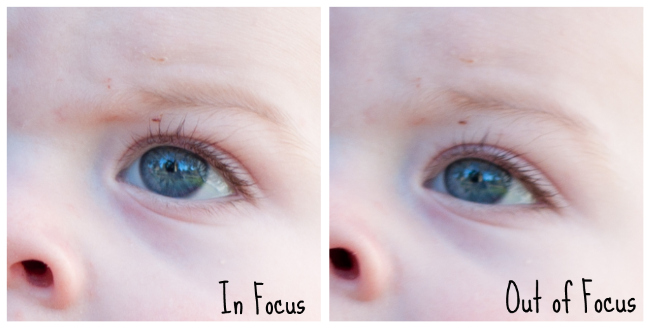
Sharp Focus- Technical photos must be in sharp core interest. To safeguard your photos are in sharp centre keep the camera unfaltering during the exposure. You should mount the camera on a tripod if the shutter speed is under 1/60 second and concentrate cautiously. Likewise, maximizing depth of field will result in sharpness in a bigger territory of the photo.
https://www.clickitupanotch.com/wp-content/uploads/2012/01/focus-issues-photography.jpg
Flash Illumination- Types are:
1.
Manual
Blaze- When you utilize
a manual glimmer set the focal point f-stop for the glimmer-to-subject
separation (the f-stop for each distance is usually displayed in a chart on the
back of the electronic flash).
2.
Automatic
Flash- Automatic blaze
units use separation ranges. Each range has a base and most extreme separation.
An f-stop is doled out to each range. Changing to another range requires an
adjustment in f-stop. At the point when in programmed streak, ensure the camera
shade speed dial is set to the blaze synchronization speed. When capturing a
high key scene (light or intelligent foundation) section exposures by opening
up a couple of f-stops.
3.
Dedicated
Flash- The essential committed blaze unit sets the right
blaze coincide speed when the glimmer is in activity. It utilizes a programmed
sensor and separation ranges. You should set the suitable f-stop for the
separation run. Further developed committed glimmer units may set both the
right blaze coincide speed and f-stop for the programmed range chose.
4.
Dedicated
TTL Flash- Through-the-perspective
streak utilizes a sensor inside the camera to control the length of the
glimmer. Utilize littler focal point gaps for short separations and bigger
focal point openings for long separations. A "certainty light" or a
"notice light" will demonstrate whether a useable f-stop was chosen.
On the off chance that the gear shows there was insufficient light, select a bigger
focal point opening and re-photo.
5.
Bounce
Flash- Utilize bob
lighting for less difference, gentler lighting, lessening the force of the
light, or to build the edge of blaze inclusion. Skip lighting is cultivated by
calculating the glimmer to mirror the flash off a white or light hued surface,
typically a roof. With manual glimmer include the separation here and there for
the blaze to-subject separation, and after that include the absorbance
misfortune (one to three f-stops). For skip lighting using a programmed glimmer
with the blaze sensor confronting the subject, utilize a range for at least
multiple times the genuine blaze to-subject separation.
6.
Multiple
Flash- To light up
enormous zones you can get great outcomes by utilizing a few glimmer units situated
around the scene. The flash units can be activated at the same time by
associating them with match up ropes or utilizing photocell gadgets that
remotely trigger the glimmer units when the camera-mounted glimmer fires. To
adjust the force of every one of the blaze units, separate the glimmer units
from the subject to give a similar f-stop an incentive for each blaze.
Available Light Photography- Available light photography is for the most helpful for enormous crime scenes during the evening when a solitary blaze won't give sufficient inclusion. Lighting for the photo might be from road lights, parking garage lights, or even twilight. Available light from road lights is much of the time utilized during the evening car accident scenes to give lighting to huge territories.
References:
1.
Lahm,
C., & Reitnauer, A. (2015). The Use of Colored Barrier Filters in Forensic
Photography. Fingerprint Whorld, 62, 158.
2.
Mancini,
K. A. (2020). Forensic Photography. In Photography in Clinical Medicine (pp.
429-447). Springer, Cham.
3.
Eisemann,
E., & Durand, F. (2004). Flash photography enhancement via intrinsic
relighting. ACM transactions on graphics (TOG), 23(3), 673-678.


Comments
Post a Comment